Leila: Measuring your body for garment sewing
If you’ve sewed your own clothes or even contemplated it, you have probably realized that mainstream sewing is extremely gendered in both terminology and stylistic expression. I’ve put together this measuring guide that I hope will allow you to sew garments that fit your body, body image, and gender expression well. When searching for a pattern we often see terminology like “womenswear” and “menswear” and the measuring paradigms are different for each. In this guide I will refer to the gendered terms that you’ll likely see in sewing patterns so that you can adapt patterns for your own body, provide a gender neutral translation and also detailed measurement guidelines.
Ease
All of our clothes require “ease.” Ease determines how closely fitting a garment is and is determined at the outset of the design and patternmaking process. “Wearing ease” refers to the amount of looseness that is required to comfortably move in a garment. Without this, you won’t be able to walk, move, lift your arms, or sit! “Design ease” is in addition to this and refers to the amount of ease added for stylistic purposes, for example loose fitting pants. Think of “Hammer Pants” versus tailored pants. The dropped crotch and loose fit of Hammer Pants is for style and they are much fuller and looser than a pair of tailored pants, however you should be able to sit, walk, and stand in each. The difference in style is created using the design ease. Woven (non-stretch) garments will have positive ease. That is, the overall dimensions of the garment will be larger than your body dimensions. Stretch garments may have negative ease if they are designed to be tightly fitting – that is, the finished measurements may be smaller than your body. This relies on the stretchy properties of the fabric and is the reason why you generally cannot sew a pattern designed for a knit with a woven fabric!
When selecting a pattern to sew, ensure you are measuring your body and using the size chart to select your size, rather than the finished measurements of the garment. This is so the intended amount of wearing and design ease is included in your final garment and will help to ensure your result resembles the product photographs. If you prefer an overall closer or looser fitting garment than the intended fit of the pattern, I do not advise simply sizing up or down. If you do, I strongly recommend making a toile or muslin (a practice garment used for fitting and often made of inexpensive fabric) and be prepared for it not necessarily being a success. The pattern shapes for fitted garments are different than those for looser fitting garments and the overall fit may be severely compromised if you size down aggressively. This, however, does not totally apply if you are adapting a pattern that makes cis-gender assumptions about body shape (for example, if you are adapting a pattern that assumes breast tissue and you do not have breast tissue or if you are binding). In all cases, I always recommend making a toile/muslin to check fit before you cut into your chosen final (fashion) fabric.
Measuring your body
Now, onto the measuring! Most of the time, you can measure yourself, but you can also have someone assist you if you prefer (sometimes it’s physically easier too). If numbers are triggering for you, try measuring using a system that is less familiar to you. For example, if you have grown up using inches, try using centimeters or vice versa. When measuring, wear whatever undergarments you will typically wear under your outer clothing. This could include a binder, undershirt, bra, briefs, boxers, etc. If you typically pack, pad, or use any prostheses, then you should be wearing those too. If you do not always bind, for example, you might like to take two measurements. Be aware that garments may fit differently if your body shape changes a lot with your undergarment choice, so if you vary your shape from day to day, you may end up making underwear-specific garments. All measurements should be taken standing if you typically stand, unless otherwise specified. If you do not stand typically, then take the measurements in your most usual position (e.g. in your wheelchair).
I prefer to use an anatomical landmarking technique for measuring for all bodies. This is because it is not gender specific and it works equally well for large and small bodies. I find it easiest to landmark lying down for the first time because it relaxes the muscles. Someone else can help you if you cannot reach easily. If you have a lot of soft tissue, you may have to palpate deeper and/or gently move soft tissue away (e.g. lift a fat roll) to identify your anatomical landmarks. Once you have found your landmarks lying, you should stand up to take your measurements with your soft tissue in its usual place. Measure your body as it is currently to ensure the best garment fit.
Please note – the position of these cardinal measurements does not change according to the style of the garment. For example, you might be making a low rise pair of jeans where the waistband sits well below the waist and in fact is closer to the anatomical position of the hip. In this case, you would still take the waist measurement and compare it to the size chart. The finished waistband measurement in this case may be larger than the waist on the size chart since it is designed to sit on what may be a fuller part of the body.
Chest
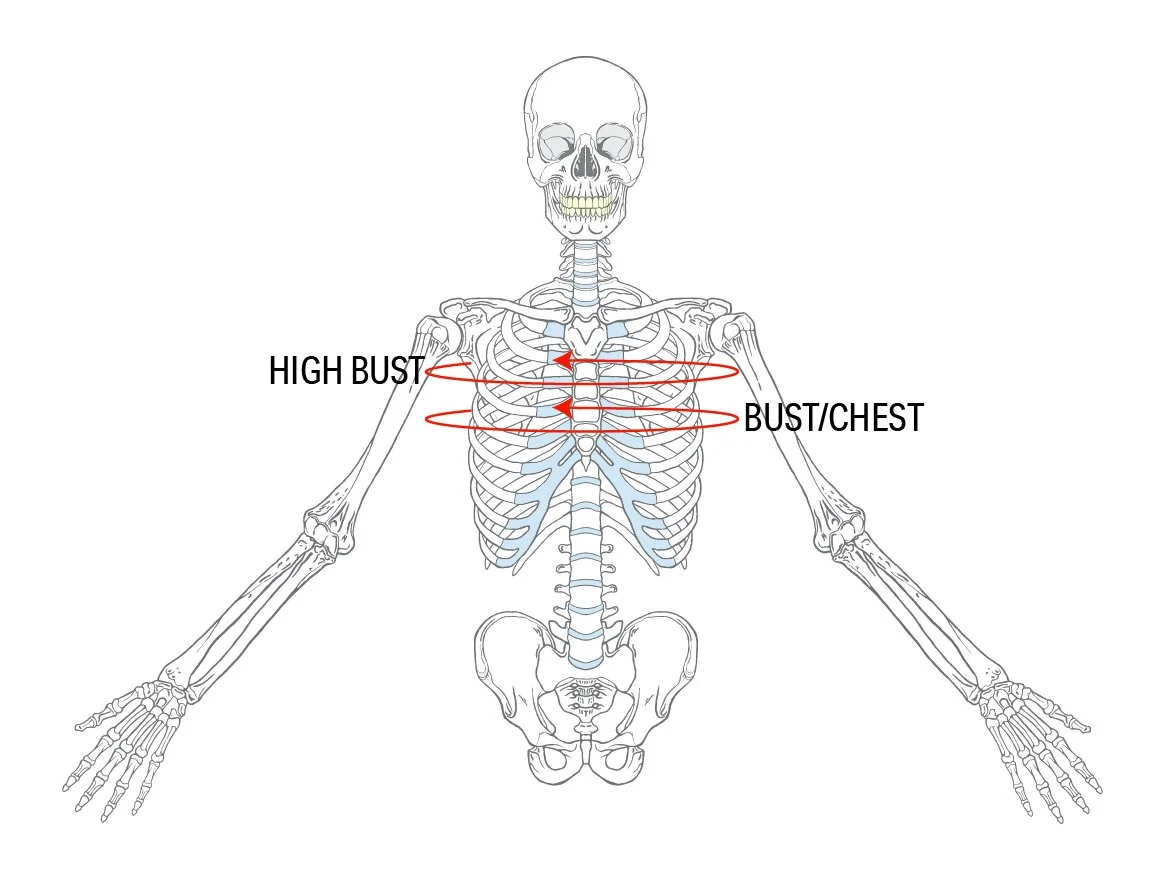
Illustration of a skeletal torso
An illustration of the torso of a genderless skeleton. Two red circles indicate girth measurement positions. The upper one is labelled high bust and is located under the arms. The lower one is in the mid chest and is labelled bust/chest
Bust (“womenswear”) or Chest (“menswear”) measurements refer to a girth measurement around the part of the chest that typically protrudes the most. If you have nipples, this could be at the nipple line, but it may not. This could especially be true if you are binding, have had top surgery, etc. If you’ve had top surgery and you have “ears” that protrude, measure at the fullest part (muscle belly) of the pectoral muscles.
High Bust measurements are typically found in “womenswear” and are used to describe the angle and amount of tissue protrusion of the chest. This is why sewing cup measurements do not correspond with bra cups. If you are sewing a pattern that assumes breast tissue (i.e. has shaping for breasts like darts or curved seams), then you’ll need to take this measurement, even/especially if you intend to adapt the pattern for a flat/er chest. It’s a girth measurement taken under the armpits, level with the ground if possible. If you have large or high breast tissue, the front part of the tape may be above your breast tissue and angle slightly upward. If you do not have breasts, you may have a larger high bust measurement than full bust.
Waist

Illustration of a pelvis and the lower portion of the spine
Illustration 2: An illustration of a pelvis and the lower part of the spine. Two red arrows point at the upper lateral portion of the pelvis. The diagram is labelled Illiac Crests
We will use a palpation technique to identify the position of the waist. The waist isn’t a defined anatomical landmark and therefore we will be using a combination of landmarks to determine our measuring point.
First, identify your iliac crests (see illustration 2). They are on the side of your body and are the sides of your pelvis. Ensure you do not inadvertently use what people call “hip bones” on the front of the body. Those are not your Iliac Crests. Lie down to relax your muscles. Using your palms, gently press in on your sides below your ribs until you reach the top of your pelvis on the side of your body. These are your Iliac Crests.
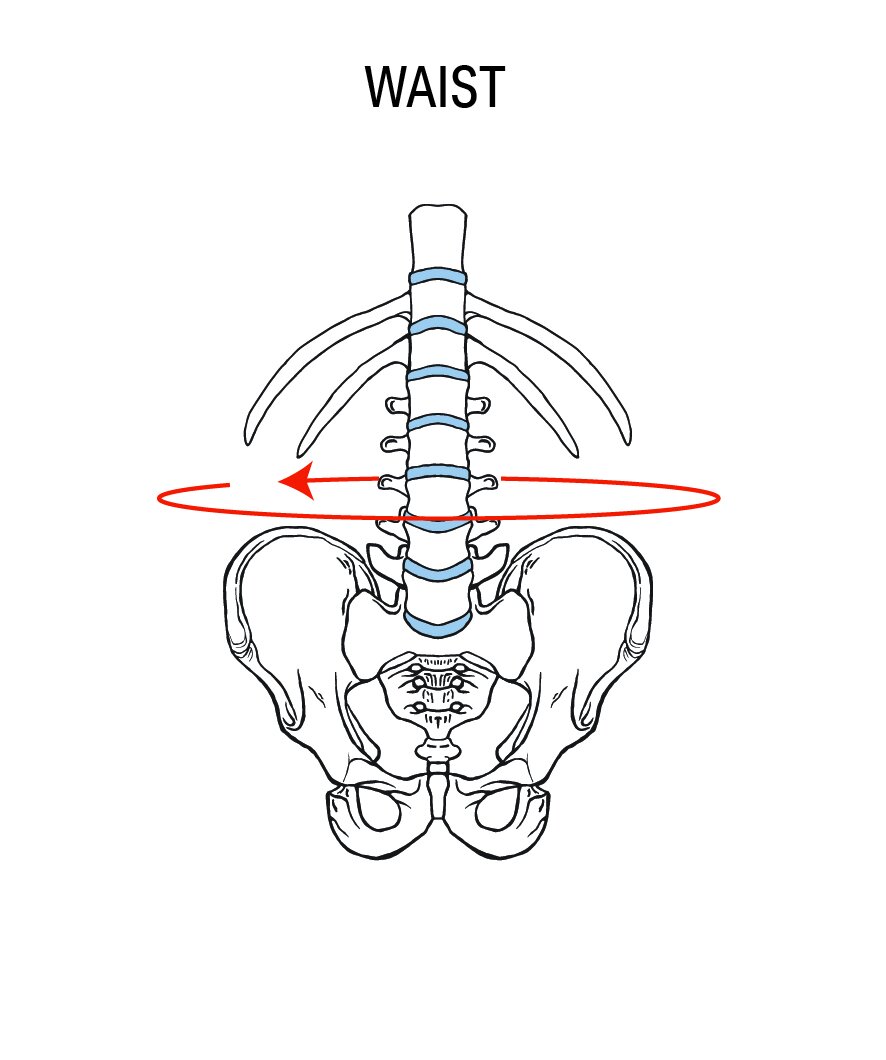
Illustration of a pelvis and the lower portion of the spine
Illustration 3: An illustration of a pelvis and the lower part of the spine. One, circular red arrow indicates a girth measurement between the top of the pelvis and the lowest visible rib. The diagram is labelled Waist
Stand and relocate your iliac crests by palpating. The waist measurement is taken two finger widths above the Iliac Crests (Illustration 3). Include all soft tissue. Measure firmly but do not displace any soft tissue. If you are very tall or have a lot of space between your lowest rib and your iliac crest, you can take the measurement halfway between the iliac crests and your lowest rib (your lowest rib will be easiest to landmark lying down to relax the muscles in the side of your body).
Hip
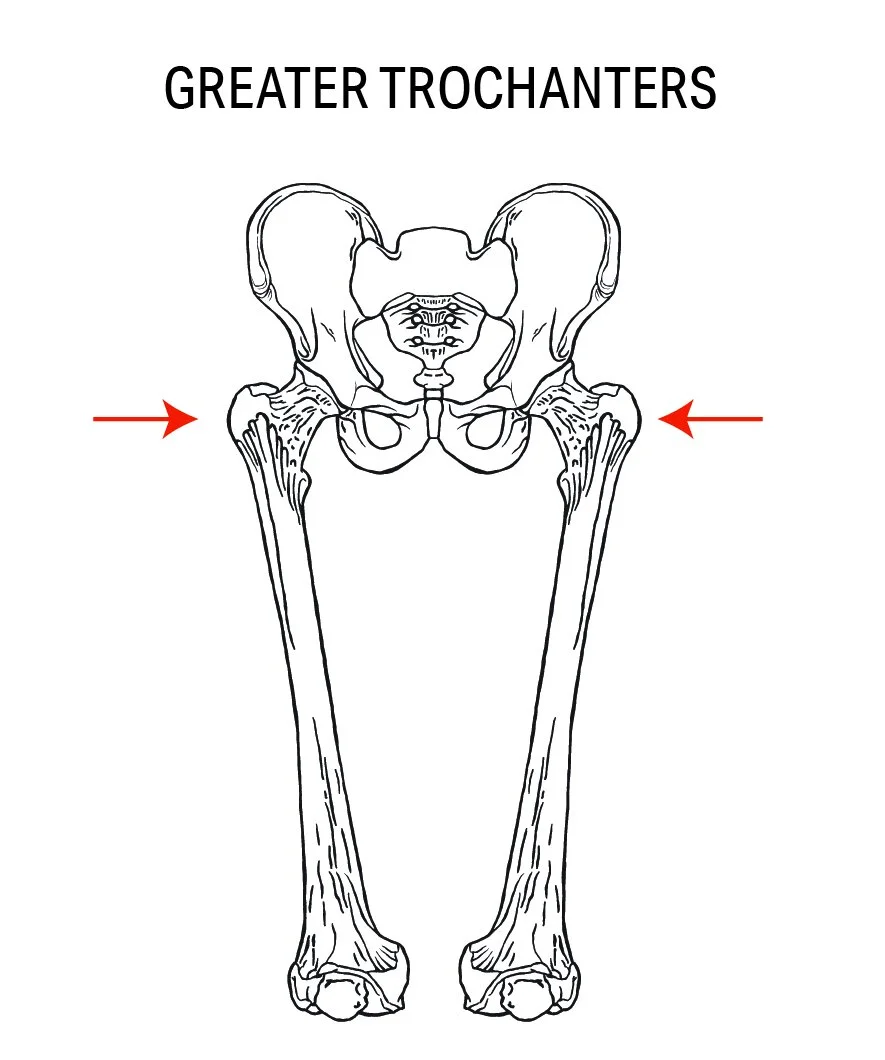
Illustration of a pelvis and the thigh bones
An illustration of a pelvis and the femurs (thigh bones). Two red arrows point at the rounded bony portions of the femurs below the pelvis. The diagram is labelled Greater Trochanters
A hip measurement is typical for all patterns and isn’t a gendered measurement. We will use a palpation technique to identify the location for the hip measurement, not the amount of soft tissue present at any level.
Identify your Greater Trochanters (please see illustration 4). Lie on your front (prone). Beginning at your Iliac Crests, palpate down the sides of your pelvis. When you reach a large bump (about level with your crotch), bend your knees and move your legs from side to side to confirm it's your hip joint (this bony protrusion will rotate under your hand). This is your Greater Trochanter. The hip measurement is a girth measurement taken at the level of the greater trochanters while standing (illustration 5). Include all soft tissue at this level both front and back. Measure firmly but do not displace any soft tissue.

Illustration of a pelvis and the thigh bones
An illustration of a pelvis and the femurs (thigh bones). One, circular red arrow indicates a girth measurement at the position of the rounded bony portions of the femurs below the pelvis . The diagram is labelled Hip
If you have a larger hip measurement above or below your hip, it can be useful to measure a girth at this point and note the vertical distance between this and your anatomical hip. If, for example, you have a high hip measurement that is significantly larger than your true hip, you may need to do an adjustment on your pattern.
Inseam
The inseam can be a slightly misleading measurement to take since it is the one measurement where the finished garment measurements should be used, however the fit of the crotch will determine how long the effective inseam is on a garment (i.e. if it’s a dropped crotch, the inseam will be very short, however the leg length of the pants might be quite typical). To measure your body (this is one where a trusted friend is a useful resource), place one end of the tape measure at your crotch. Ensure you’re wearing the underwear you prefer and any packers, padding etc. to ensure the vertical crotch position is accurate. The end of the tape should be slightly below grazing the lowest part of your anatomy in that area. The inseam measurement should not take into account any preferences about crotch fit (that is a pattern specific feature), but you do need to ensure there is enough space for your genitalia. The measurement will go between your crotch and your inside ankle bone (medial malleolus).
Sewing for a changing body
Sometimes our bodies are in a state of rapid fluctuation. For example, if you are post top-surgery and have residual swelling or if you need to wear compression garments, I suggest measuring as is, with the knowledge that your shape may change over time. You may like to add extra seam allowance in the side seams and finish the seams separately so you can adjust your garments at a later stage. You may also wish to select looser fitting or elastic waisted garments to assist with adapting your garments as your body changes.
Bodies are divergent. It is important to select a pattern that has a fit that is very close to your actual body measurements, regardless of your gender expression or how the pattern is marketed/presented. Most, if not all “unisex” (sorry, I loathe that term but it is used fairly regularly) patterns are based on a “menswear” block. No matter your gender expression, these patterns will not fit all bodies well, especially bodies that have a meaningful hip to waist ratio or breast tissue (even if bound). In this case, it is often more successful for folks to adapt a “womenswear” pattern to their stylistic and gender affirming goals than to use a “unisex” pattern.
I hope this measurement guide was useful and affirming to you. I strongly believe we all deserve clothes that fit our bodies and expression and these are not always available to buy. Sewing our own clothing gives us autonomy and is an empowering and affirming practice.
Leila (she/her) is the patternmaker for Muna and Broad, an independent sewing pattern company that centres large bodies. As a fat, queer maker, she draws on her expertise in patternmaking from her training in fashion production combined with her knowledge of the human body as a biomechanist. When she isn’t making sewing patterns or sewing, she is a college professor of biomechanics at a large college in Canada. She can be found on Instagram at @leila_sews.
Leila lives in Ontario, Canada, on land stolen from the Anishinaabek, Haudenosaunee, Lūnaapéewak, and Attawandaron peoples.
To learn more about Leila, you can watch her IG Live conversation with SewQueer Founder, Shannon, on YouTube by clicking here.
Sew Queer is a community, and we welcome comments and discussion. In order to create a welcoming and multivocal space working towards a more just and equitable future, we review every comment before approval. Comments promoting racism, classism, fatphobia, ableism, or right wing political ideology are not allowed and will not be approved. For more details on commenting, visit our commenting guidelines.